With color printers, it has become much easier to print pictures that have a considerable amount of quality to them. On top of that, now that there is inexpensive picture paper available, the quality of picture that can be printed is even greater. So long as the printer is of a good enough quality that it can handle specific details, the pictures that come out of it will look intense.
Printing Pictures
The first step is to open the Windows Photo Gallery program. You can find this under all programs. Then, pick the actual picture that you want to print. Click open and then select the image that you want to print. If you want to have multiple different pictures print, hit the control button and then select each one. Then on the gallery, there will be a scroll feature so you can go from picture to picture.Print Pictures
Now that the pictures are up on the screen, add the type of paper you want to print on to the printer. It is better to use photo paper because then the pictures will look like actual photographs. However, you can use simple printing paper and the picture will come out relatively clear.
Once the printer is prepared, hit the print button. Select the printer and the paper size. On top of that, you can also select the number of photos you want, the paper quality and the layout of the picture. These are all details that the printer will use to print a clear, good picture. Hit the print button and then the pictures will print. Because they are pictures, they take a little longer to print than if they were documents, but most printers today can process a picture much faster than when color printers first came out. Once the printing is done, close Windows Photo Gallery and enjoy the photos.
Monday, February 17, 2014

Sunday, February 16, 2014
Ink Cartridge Refills
Official ink cartridges are expensive when compared with the cost of illing them. The price of new cartridges is so high, some consumers resort to buying a new printerwhen they run out. The printer manufactures argue that without expensive cartridges, printers would cost a lot more. That is probably true, but the consumer doesnt have to play that game.
Messy Refills
Ink cartridge ill kits contain everything required to fill an empty cartridge . The no-brand kits have an ink bottle and syringe, while the professional kits have an ink-filled bulb with a needle attached. Almost all kits come with rubber gloves, and for good reason.
Refilling ink cartridges can be messy, but most people become good at illing after a few attempts. The bulbs are the easiest and cleanest method, and they can usually be found next to the official cartridges.
Ink Cartridge Refills
Risky Refills
Using illed ink cartridges voids the warranty of most printers. The latest trick is to use a unique computer chip on the cartridge that tells the printer its genuine. If the same chip is found after a certain number of prints, the printer will permanently record this as proof that illed cartridges were used.
Printer manufacturers argue that illed ink cartridges can damage a printer. While the occasional no-brand kit will have watered-down ink that can ruin printers, many professional ills come with a warranty against printer damage. Besides, new printers are released every six months, cheaper and better than the last model. The main concern for consumers should be how well their prints look when using ink ills.
Print Quality
Black and white prints should not look different with ink ills, but color prints may have different colors, or the colors will be less vibrant. However, even ill kits cant compete with department store photo labs for price quality and convenience.
As long as you dont expect top quality photos, and dont mind a bit of mess, illing inkjetcartridges can save you a small fortune. But the most satisfying part is beating the printer manufacturers at their own game.
Messy Refills
Ink cartridge ill kits contain everything required to fill an empty cartridge . The no-brand kits have an ink bottle and syringe, while the professional kits have an ink-filled bulb with a needle attached. Almost all kits come with rubber gloves, and for good reason.
Refilling ink cartridges can be messy, but most people become good at illing after a few attempts. The bulbs are the easiest and cleanest method, and they can usually be found next to the official cartridges.
Ink Cartridge Refills
Risky Refills
Using illed ink cartridges voids the warranty of most printers. The latest trick is to use a unique computer chip on the cartridge that tells the printer its genuine. If the same chip is found after a certain number of prints, the printer will permanently record this as proof that illed cartridges were used.
Printer manufacturers argue that illed ink cartridges can damage a printer. While the occasional no-brand kit will have watered-down ink that can ruin printers, many professional ills come with a warranty against printer damage. Besides, new printers are released every six months, cheaper and better than the last model. The main concern for consumers should be how well their prints look when using ink ills.
Print Quality
Black and white prints should not look different with ink ills, but color prints may have different colors, or the colors will be less vibrant. However, even ill kits cant compete with department store photo labs for price quality and convenience.
As long as you dont expect top quality photos, and dont mind a bit of mess, illing inkjetcartridges can save you a small fortune. But the most satisfying part is beating the printer manufacturers at their own game.
Monday, December 2, 2013
HP Laserjet 4 and 4 plus series service mode
1. Hold down the [On Line], [Form Feed], and [Enter] keys while powering ON the printer, until the ON LINE and FORM FEED indicators are both illuminated and the Display Window is blank. (If the Display Window reads 05 SELF TEST at this point, the keys were released too soon. Repeat this step until successful.)
2. Press the [Form Feed] key, then the [Enter] key. The message SERVICE MODE is displayed briefly, then the printer automatically begins a 05 SELF TEST. After several seconds, the ON LINE and FORM FEED lights turn OFF.
(The printer may display 02 WARMING UP if it has not warmed up completely.) After the printer has warmed up and passed the self test, SERVICE MODE is displayed.
3. Press [Menus] once to display SERVICE MENU.
4. Once it says SERVICE MENU press ITEM to scroll through service mode items.
5. To exit the Service Mode press the [On Line] key.
2. Press the [Form Feed] key, then the [Enter] key. The message SERVICE MODE is displayed briefly, then the printer automatically begins a 05 SELF TEST. After several seconds, the ON LINE and FORM FEED lights turn OFF.
(The printer may display 02 WARMING UP if it has not warmed up completely.) After the printer has warmed up and passed the self test, SERVICE MODE is displayed.
3. Press [Menus] once to display SERVICE MENU.
4. Once it says SERVICE MENU press ITEM to scroll through service mode items.
5. To exit the Service Mode press the [On Line] key.
Sunday, December 1, 2013
HP Printer Manual
 This HP Printer Service manual is for HP LaserJet 8000. You can use this HP Printer Manual to assist troubleshooting the printer problems. Troubleshooting chapter tell you how to indentify the causes for printer errors.
The troubleshooting process is a systematic approach that addresses the major problems first and then other problems as you identify the causes for printer malfunctions and errors. The Troubleshooting Process, figure 7-1 on page 378 and figure 7-2 on page 379, illustrates the major steps for troubleshooting the printing system. Each heading depicts a major troubleshooting step. A YES answer to
the questions allows you to proceed to the next major step.
A NO answer indicates that additional testing is needed. Proceed to the referenced location and follow the directions for that area. After completing the additional testing, proceed to the next major step.
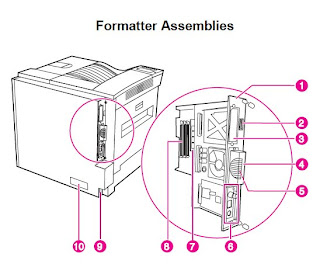
Table 7.1 is Major Steps for Troubleshooting list describes the basic questions for the customer and the corresponding troubleshooting step to help you quickly define the problem(s). Read carefully this HP LaserJet 8000 Printer Service Manual!
Saturday, November 30, 2013
How to Resetting the maintenance count LaserJet 9040mfp 9050mfp
1. Turn the MFP off.
2. Turn the MFP back on and wait for the memory count to begin, when the printer starts counting memory press and hold the 6 button.
3. When the three LEDs are on, release the 6 button. SELECT LANGUAGE appears on the screen.
4. Press and release the 3 button until NEW MAINTENANCE KIT appears on the screen.
5. Press and release the 6 button again.
2. Turn the MFP back on and wait for the memory count to begin, when the printer starts counting memory press and hold the 6 button.
3. When the three LEDs are on, release the 6 button. SELECT LANGUAGE appears on the screen.
4. Press and release the 3 button until NEW MAINTENANCE KIT appears on the screen.
5. Press and release the 6 button again.
Friday, November 29, 2013
Reset EEPROM Printer Canon iP6210D
You can use this software for restore EEPRsaya Printer Canon iP6210D, iP6220D, MP150, MP170, MP450, iP2200, iP1600
Restore EEPRsaya Code for iP6210D, iP6220D, MP150, MP170, MP450
1. While pressing and holding the Power Button, plug the power into a power source. (The Power Led lights. Do not release the Poser button)
2. Push the Stop/Reset button one time while pressing and holding the Power button. Release the power button. The machine enters into the special mode.
Restore EEPRsaya Code for Canon iP2200/iP1600
1. While pressing and holding the Resume/Cancel button, plug the power cord into a power source.(Do not release the Resume/Cancel button)
2. After the power LED stays lit, press the Power button while pressing and holding the Resume/Cancel button.
3. Release the Resume/Cancel button while pressing and holding the Power button, then release the Power button. Both the Power LED and Alarm LED light
Restore EEPRsaya Code for iP6210D, iP6220D, MP150, MP170, MP450
1. While pressing and holding the Power Button, plug the power into a power source. (The Power Led lights. Do not release the Poser button)
2. Push the Stop/Reset button one time while pressing and holding the Power button. Release the power button. The machine enters into the special mode.
Restore EEPRsaya Code for Canon iP2200/iP1600
1. While pressing and holding the Resume/Cancel button, plug the power cord into a power source.(Do not release the Resume/Cancel button)
2. After the power LED stays lit, press the Power button while pressing and holding the Resume/Cancel button.
3. Release the Resume/Cancel button while pressing and holding the Power button, then release the Power button. Both the Power LED and Alarm LED light
Thursday, November 28, 2013
Fix Samsung SCX 4300 error
Use bat files instead of command line interface.
Patch both for 1.13/1.16 versions and corresponding *.bat files you may find via russian link(startcopy.ru):
_http://www.startcopy.ru/repair/files/scx4300_sc1.zip
Original firmwares links:
_http://www.startcopy.ru/repair/files/scx4300fw113.zip (1.13)
_http://www.startcopy.ru/repair/files/scx4300fw116.rar (1.16).
To reset all counters and unblock printer now you have choice:
1. In Tech mode: go Data Setup > Clear counters. In this menu you will find "Clear All CNT "
instead of "Total Page CNT". Choose "Clear All CNT" then press [OK].
2. in User mode: go 10 .Maintenance > Clear Setting > All Setting [OK]
Patch both for 1.13/1.16 versions and corresponding *.bat files you may find via russian link(startcopy.ru):
_http://www.startcopy.ru/repair/files/scx4300_sc1.zip
Original firmwares links:
_http://www.startcopy.ru/repair/files/scx4300fw113.zip (1.13)
_http://www.startcopy.ru/repair/files/scx4300fw116.rar (1.16).
To reset all counters and unblock printer now you have choice:
1. In Tech mode: go Data Setup > Clear counters. In this menu you will find "Clear All CNT "
instead of "Total Page CNT". Choose "Clear All CNT" then press [OK].
2. in User mode: go 10 .Maintenance > Clear Setting > All Setting [OK]
Subscribe to:
Posts (Atom)